-
Contributing Member


Originally Posted by
Surpmil

And other times perhaps genuinely "really good" appearing ideas are still-born only because they appear to similar dead-ends?
Ha! Questions which provably have answers but are provably impossible to answer?
I would say no. Meticulously following every lead no matter how ridiculous it seems is a normal part the job - like always first ensuring a clear chamber before anything else. Then again, if I am wrong I have no way of knowing it because as you say it would have already been dead, unless of course someone else answers to the contrary to provide me the example.
https://en.wikipedia.org/wiki/Decidability_(logic)
Ok...back to finishing my checkering cradle. The other job can wait till Monday morning.
-
Thank You to ssgross For This Useful Post:
-
04-06-2024 02:02 PM
# ADS
Friends and Sponsors

-
Contributing Member
I got caught up between my day job and the summer's honey-do list. Father's Day put me back at it though!
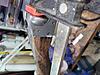
A small shard was missing starboard underside. I already had 2 more cracks in the sidewalls I found while doing the top piece that needed spread open and fixed - and a noticeable chunk missing along the edge of the butt. So we mixed some acraglas and took care of all these issues.
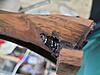
The sidewall on the right side is much thinner than the left. In addition to the blowout top and bottom, there were 2 more lateral cracks. I spread these open, filled with acraglas, and smeared more acraglas to coat the inner surface to reinforce it. Hopefully I don't have to take off too much of the addition to get the hammer to fit. I'm punting on that one.
Time to fit up (or re-fit) the frame.
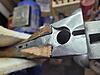
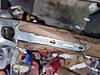
The cause of the initial blowout(s) was obvious during disassembly. Oil soaked end grain allowed fibers to compress under recoil until the thin outer edges bore against the frame. I pulled out all the oil I could from the end grain by smearing on a paste of chalk dust and acetone followed by a heat gun, and then I soaked the entire inletting area in a jar of acetone for a couple days. Lastly, I lightly scraped away the loose fibers.
Any adjustments, either from damage or repairs, to the bearing surfaces changes the alignment of the frame to the stock. So I skim-coated these surfaces with acraglass to make a new starting point. As you can see, the frame is now riding a bit low - original wood is proud on top and recessed on the bottom. Working back the top edge of the replacement piece allows it to slide down...until the recoil surface makes contact under the tang. The whole frame now pivots on this area. There is still a bit more to go. Once I get it where I like it, I will glass bed behind the tang, skim coat any exposed end grain around the edges, and finally set a tiny gap on all areas that shouldn't bear any recoil forces. Lots to do still. I can't see my inletting black on the dark wood inside, so I pilfered some lipstick and got yelled at. Slight delay while I go shop for my own stick! They make neon glow in the dark/blacklight lipstick! Order placed (Jerrows seems out of business)!
-
The Following 3 Members Say Thank You to ssgross For This Useful Post:
-
-
Contributing Member
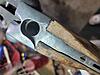
I think the hard part is done! I got the guts glass bedded. There was lots of shrinkage under the frame's tang from bubba cranking down on screws to try to keep it all tight. This in turn bent the bottom tang too as the angle changed.
I fixed all that by squaring up the leading edge of stock with the frame, and then holding in tight to the face with a clamp fore-to-aft. I should mention the recoil stud was barely engaged when all was squared up with the unmolested side. Regardless it was trimmed back 30 thou or so short of engaging the frame at all (enough room for my epoxy). I then gently persuaded the bottom plate tang back in to shape to engage the stock again at right spot (between the screws) with it's rear edge square to the sidewalls. Yes, there is even engagement all along the front edges which would be a bad thing. Keep reading.
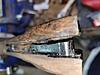
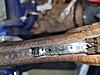
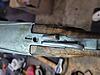
Dab of epoxy in all the right places, then clamped it all up again for-to-aft and tightened the screws (plenty of release agent everywhere, and plumber's putty filling in all the tangs and frame). Looks pretty good. A bit of work to re-cut the channel for the safety bar, and the channels for the trigger return spring wires. Easy peasy.
Now, with everything tightly bedded and square to the leading edges, we will shave back those leading edges by 30 thous. or so, bed them with another round of epoxy, then shave that epoxy back 20 thous or so. This will leave an unnoticable gap between frame and edges so the recoil stud bears all the force, and also seal the end grain to prevent it soaking up oils and causing the same blowout I just repaired.
Things should move a bit faster now that the delicate work is all done.
-
The Following 2 Members Say Thank You to ssgross For This Useful Post:
-
Contributing Member
-


 PM
PM


